First steps with YAFFA
The very first look to your YAFFA instance can be both looking empty and overwhelming at the same time. This guide will help you to get started with YAFFA, and to understand the basic concepts and features of the application.
Your YAFFA Dashboard can look a bit different based on the range of default assets you have selected to be created for you during the registration process.
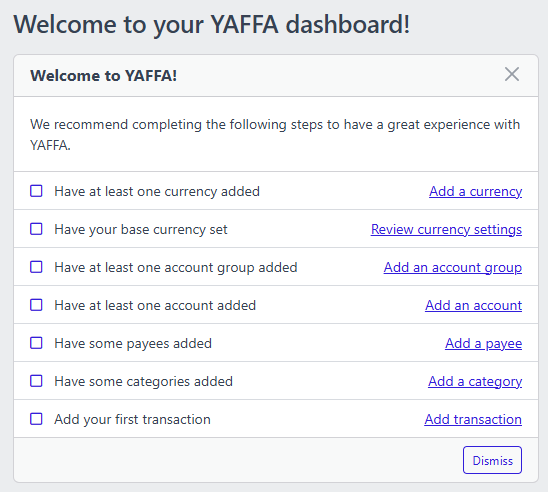
You should see the Getting Started Guide with the first steps you need to take. As you complete each step, the guide will update to show the next step. The following order is recommended to be taken, as some assets depend on others already created. However, feel free to skip and dismiss the guide at any time, you feel that you are ready to explore the application on your own.

1. Currencies
The first thing you should do is to create and set the base currency of your YAFFA instance. The base currency is the currency in which you want to see the total value of your assets and liabilities, and the majority of the reports. You can change the base currency at any time, but it's recommended to decide and set it at the beginning of your financial tracking journey, and not to change it later.
See the Currencies article for more information on currencies, how they are used, and how they are created.
2. Account groups
Add at least one account group to categorize your accounts. Account groups are used to group accounts together for easier management and reporting. You can create as many account groups as you need, and you can change the account group of an account at any time.
- Some examples of account groups are:
Cash,Bank accounts,Credit cards,Investments,Long term investments,Loans. - Alternatively, you can create account groups based on the purpose of the account, like
Personal,Business,Family. - You can also go ahead, and create one
Defaultaccount group, and move all your accounts there. You can always change the account group of an account later.
See the Account groups article for more information on account groups, how they are used, and how they are created.
3. Accounts
Add at least one account to start tracking your financial transactions. An account is most often a bank account, a credit card, your wallet, or an investment account. You can create as many accounts as you need.
See the Accounts article for more information on accounts, how they are used, and how they are created.
4. Payees
Add at least one payee to start recording your financial transactions. Payees are entities that you pay money to (groceries, stores, restaurants, service providers) or receive money from (your employer in most cases). You can create as many payees as you need, but you should start with one or more that you have visited recently, and you want to record a transaction with.
See the Payees article for more information on payees, how they are used, and how they are created.
5. Categories
It's not mandatory to create categories at the beginning, but it's one of the most important features of YAFFA and expense tracking or budgeting in general, so worth to start using it as early as possible.
Coming up with a categorization system can be a bit overwhelming, but you can start with a few categories and add more as you record transactions. For ideas on how to categorize your expenses, see our Sample Categorization Systems article.
See the Categories article for more information on categories, how they are used, and how they are created.
6. Transactions
Great job! You have set up the basic building blocks of YAFFA. Now you can start recording your financial transactions. Look at a receipt or a bank statement, and record a transaction with the payee, category, and account you have just created.