Install and Configure YAFFA using Docker on a VPS
This article will help you install a working instance of YAFFA on your VPS. It will guide you through the installation of YAFFA web application itself. In this tutorial we'll also apply some advanced configurations to use a custom subdomain and port for the application, and to set up HTTPS to access YAFFA.
One advantage of this Docker-based setup is that you do not need to install Node.js, npm, or run the frontend build on the VPS host. The containerized deployment takes care of the application runtime without requiring a separate host-side Vite build.
This guide uses the following providers for the VPS and other services. (No affiliation with any of the services mentioned.)
- Google Cloud Platform (GCP) for the VPS, with billing enabled. This is necessary even if you select the free tier of the VM. You can use any other VPS provider, but the steps may vary.
- noip.com for the dynamic DNS service. You can use any similar providers, or any domains and subdomains you own, and can configure the DNS records.
1. Create a new VPS instance
Assuming that you have an account in GCP, and you have enabled billing, you can create a new VM instance using the following steps.
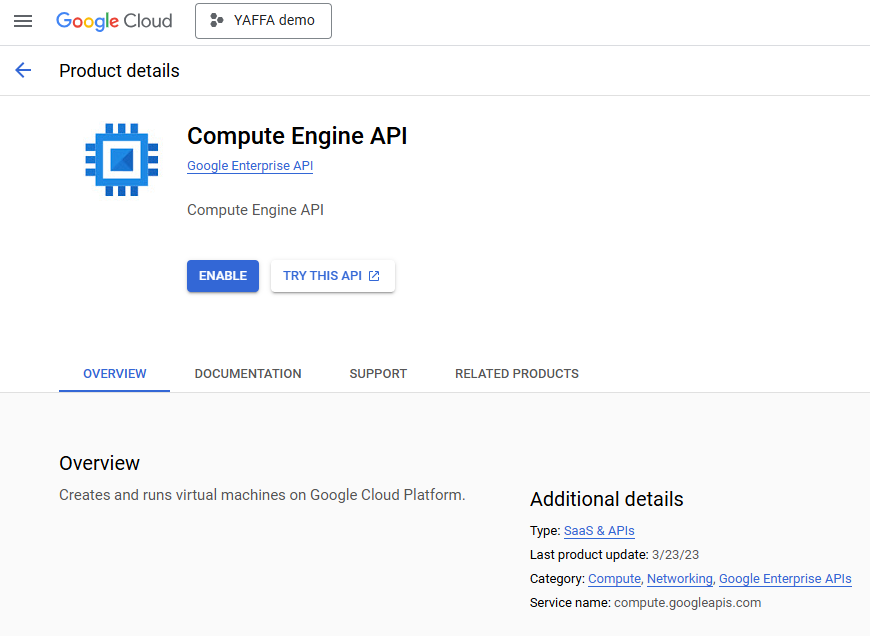 If this is a new GCP project, then first you need to enable the Compute Engine API. If you are prompted to enable the API, click on the Enable button on the "APIs & Services" screen, where you get redirected. It can take up to a few minutes to enable the API.
-
 Let's create a firewall rule to allow traffic on the ports that YAFFA uses. Open the Firewall Policies page in the GCP console. Click on the Create Firewall Rule button. These are the main settings you need to configure. Everything else can be left as default. (The screenshot includes the key settings only.)
- Name: yaffa-vm-custom-ports
- Target tags: yaffa-vm
- Source IPv4 ranges: 0.0.0.0/0
- Add your own IP address if you have a static one, and you want to restrict access to YAFFA.
- Specified protocols and ports
- TCP: 8400
- Feel free to change this if you want to use different one. You can add 80 and 443 for HTTP and HTTPS respectively.
Push the "Create" button to create the firewall rule.
-
Let's proceed to creating the virtual machine. Open the VM Instances page in the GCP console. Click on the Create Instance button. These are the main settings you need to configure. Everything else can be left as default.
-
Machine configuration
- Name: yaffa-vm
- Region and zone: Select a region closest to you, but this is not critical. The default is fine.
- Machine type: Select the machine type you want. Be mindful of your selection due to the billing implications.
tip- In my experience, the
e2-micromachine type that is part of the free tier offering of GCP is NOT sufficient to run YAFFA. I recommend using at least thee2-smallmachine type. - 10 GB of standard or balanced disk space is sufficient for the OS and the application. You can increase this if you want to store more data on the VM.
-
OS and storage
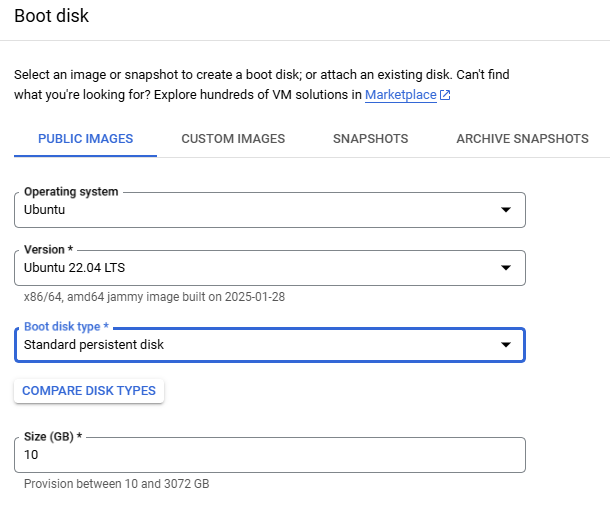 Boot disk: Select the OS image you want. The tutorial uses Ubuntu 22.04 LTS for x86/64 architecture. You can use any other OS, but the steps may vary.
-
Networking
- Network tags: Add the network tag your created in the previous step, e.g
yaffa-vm. This is necessary for the firewall rule to work.
- Network tags: Add the network tag your created in the previous step, e.g
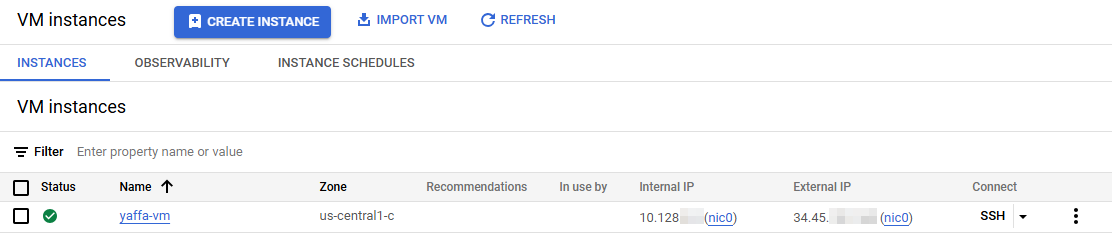
You can leave the rest of the settings as default. Push the "Create" button to create the VM instance. In a few minutes, the VM will be ready and running. You should see the green checkmark next to the VM name. Make note of the external IP address of the VM for the next steps.
-
2. Subdomain and dynamic DNS
YAFFA can be accessed using the IP address of the VM, but it is more convenient to use a domain name. In this guide, we will use a subdomain of a DNS provider, but you can use any domain and subdomain you own. You need to configure the DNS records to point to the IP address of the VM.
-
 After registering and logging in to noip.com, you can create a new hostname. You can use the free tier of the service, but you need to confirm the hostname every 30 days. Click the "Add hostname" link to get started.
 -
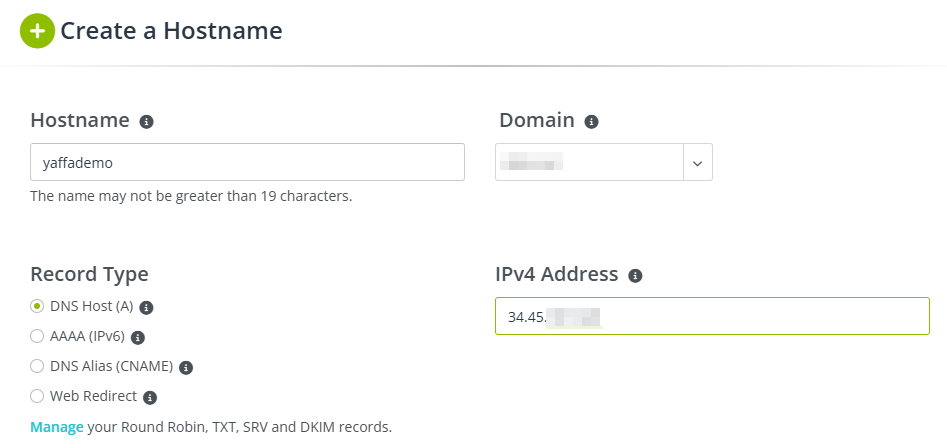 Select a hostname and a domain from the provided list. Add the external IP address of the VM in the "IPv4 address" field. You can leave the rest of the settings as default. Click the "Create Hostname" button to create the hostname.
3. Download and configure YAFFA
The next steps will guide you through the installation of YAFFA on the VM using Docker. For this, we'll use the terminal of the VM. For convenience, you can click the SSH button next to the VM name in the GCP console to open a terminal in the browser. Authenticate with your Google account if prompted.
3.1. Install Docker and Docker Compose
As a generic first step, make sure to update the package list and upgrade the installed packages on the VM.
sudo apt update && sudo apt upgrade -y
Install the latest version of Docker and Docker Compose on the VM. You can follow the official installation guides for Docker and Docker Compose. I suggest completing the post-installation steps for Docker to run it as a non-root user as described in the related guide. This will allow you to run Docker commands without using sudo, and also to start Docker at boot.
3.2. Download YAFFA files
Now, let's proceed to getting the YAFFA files and configuring the application. Assuming that you are in the home directory of the user, you can create a new directory for YAFFA and navigate to it.
mkdir yaffa && cd yaffa
Retrieve the necessary files to run YAFFA with Docker. You need to download the docker-compose.yml and .env files. You can use the terminal to download the files directly.
curl -o docker-compose.yml https://raw.githubusercontent.com/kantorge/yaffa/refs/heads/main/docker/docker-compose.yml
curl -o .env https://raw.githubusercontent.com/kantorge/yaffa/refs/heads/main/.env.example
To set up HTTPS access, you also need a Caddyfile to configure Caddy as a reverse proxy. You can download it using the following command.
curl -o Caddyfile https://raw.githubusercontent.com/kantorge/yaffa/refs/heads/main/docker/Caddyfile
3.3. Configure YAFFA
As any Laravel application, YAFFA needs to be configured to work with your environment. This includes setting up the database connection, application key, and other settings.
- To do this, open the
.envfile in your text editor, e.g.
nano .env
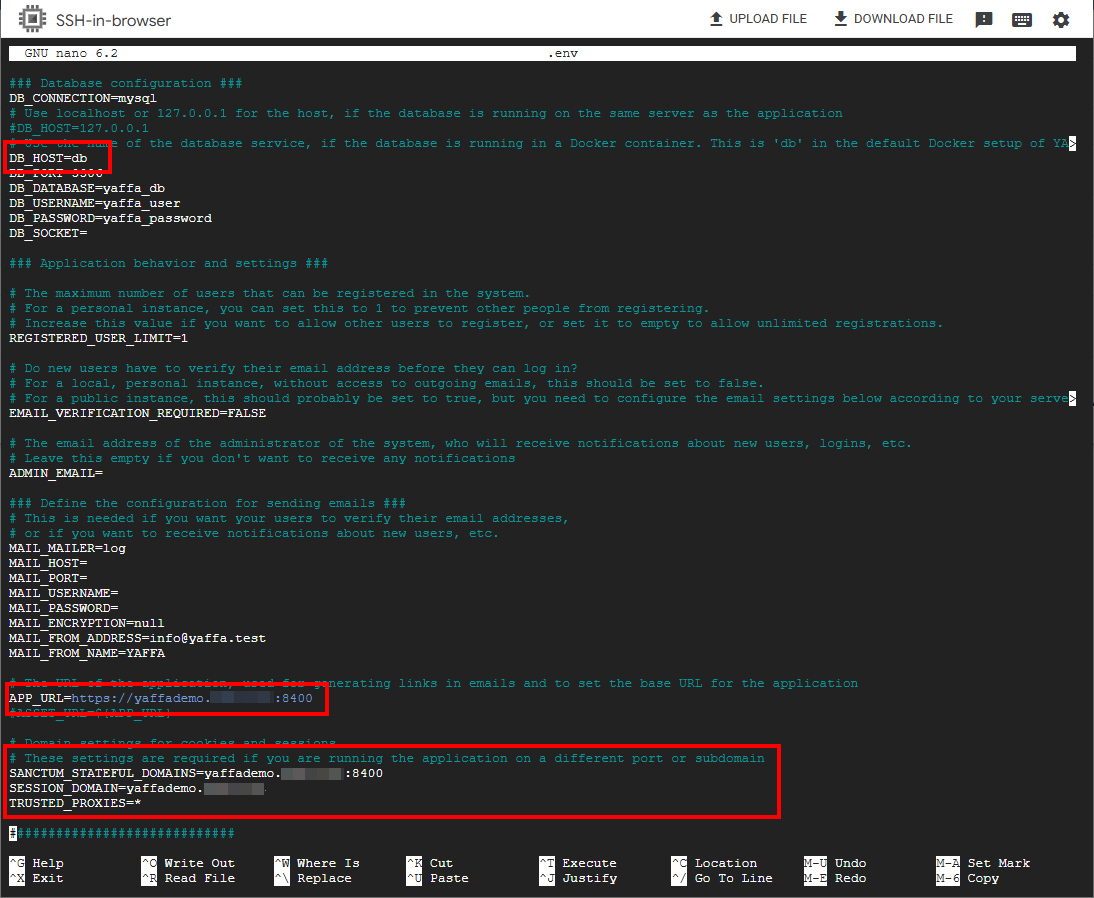 Review and edit the database settings if you want to use a different database name, user, or password. Most importantly, you need to set the
 DB_HOST to db, which is the name of the MySQL service in the Docker Compose file.
In this tutorial, we also configure the application to use a custom subdomain and port. Make the following changes, too, adapting them to your domain and subdomain.
APP_URL=http://yaffa.example.com:8400

SANCTUM_STATEFUL_DOMAINS=yaffa.example.com:8400
SESSION_DOMAIN=yaffa.example.com

TRUSTED_PROXIES=*
Once you are done with all changes, save the file and exit the editor.
You also need change the application key, either manually by editing the .env file, or by running the following command in the terminal. This will fill in the APP_KEY value in the .env file, or overwrite it if it already exists.
(It assumes, that you are in the yaffa-docker directory, and you have OpenSSL installed, which should be the case by default on most Linux/macOS systems.)
grep -q '^APP_KEY=' .env && \
  sed -i 's|^APP_KEY=.*|APP_KEY=base64:'"$(openssl rand -base64 32)"'|' .env || \
  echo "APP_KEY=base64:$(openssl rand -base64 32)" >> .env
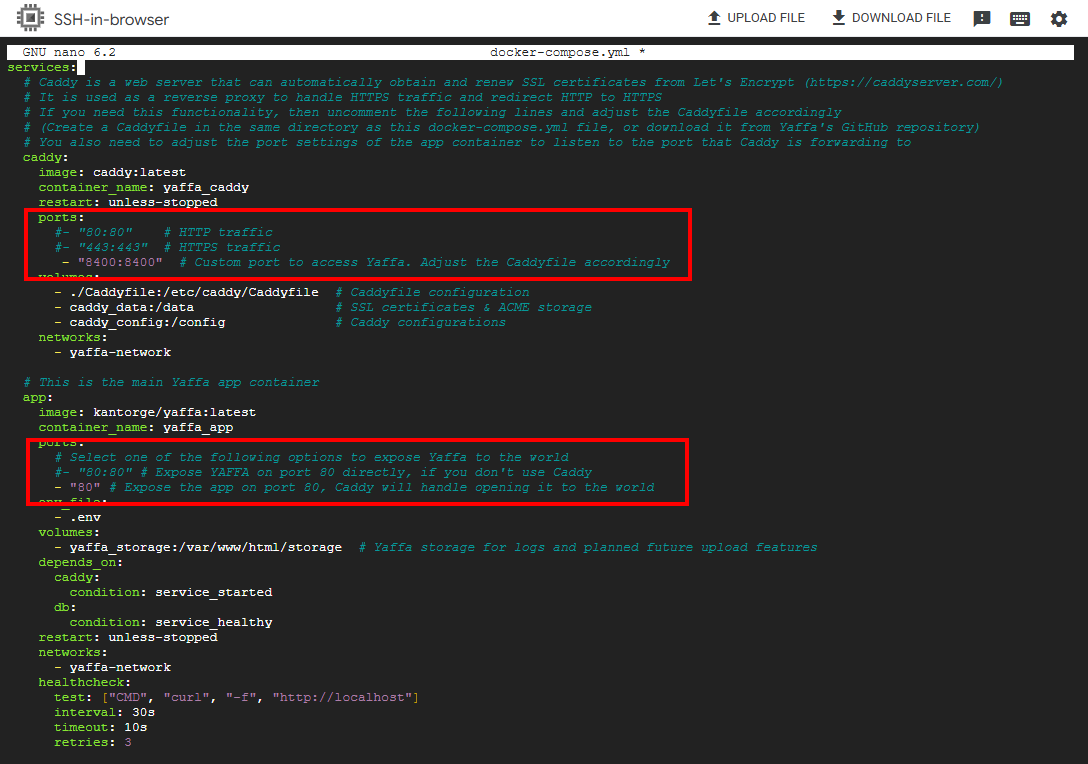 Given that we use a custom port for the application, we also need to update the
 docker-compose.yml file to expose the port to the host. Open the file in your text editor.
nano docker-compose.yml
Find the ports section of the app service and update it to use port 80, without exposing it externally. Caddy will handle the HTTPS traffic and forward it to the application.
services:
  app:
    ports:
      - "80"
Similarly, update the ports section of the caddy service to expose the custom port 8400 to the host.
  caddy:
    ports:
      - "8400:8400"
Finally, you need to adjust the Caddyfile to use your domain and subdomain. Open the file in your text editor.
nano Caddyfile
Update the sample domain and subdomain to your own, and save the file.
yaffa.example.com:8400 {
  reverse_proxy app:80
}
4. Start YAFFA
At this point, you can start YAFFA using Docker Compose.
docker compose up -d
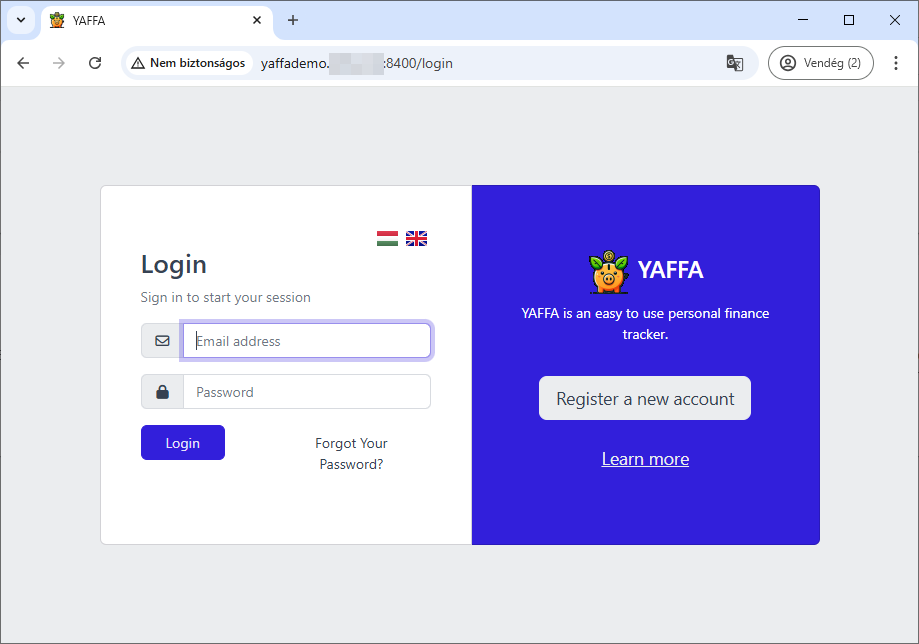
Once the images are pulled and the containers are created, you can access YAFFA using the subdomain and port you have configured.
You now have a working instance of YAFFA, which stores its data in a MySQL database. The MySQL files, logs, and any uploaded content are located in the yaffa_db and yaffa_storage Docker volumes, respectively.
- If you delete these volumes, you will lose all your data.
- To back up your YAFFA data, please refer to the Backup YAFFA Docker Volumes guide.
- To restore from a backup, please refer to the Restore YAFFA from Docker Volume Backups guide.
- If you want to keep your data private, you need to secure access to the Docker volumes.
For a production-ready VPS instance, regular automated backups are essential to protect your financial data and ensure business continuity.
Also, the various security settings of the VM, the Docker containers, and the YAFFA application are not fully covered in this guide. Make sure to take further steps to secure your environment if you plan to use it in production.